Gameking multi cartridges

 General  Comments Off on Gameking multi cartridges
May 162015
 

Im still working on Gameking things when time permits.
Team Europe has also started to dump new Gameking games and up until recently we have had no way to test our dumps.
I have now made a multi game cartridge for the Gameking which can hold 4 128KB size games and are selectable via two dipswitches.

So far all the games we have dumped seem to work just fine although Team Europe has recently dumped an actual multi game which will NOT work on this board.
GameKing Cart

I realise that there wont be many people in the world that would want one of these but if you do I currently have 4 spare for sale at £10gbp + postage fully assembled with blank flashROM.

May 032015
 

Do you have an oscilloscope and you never use it?Don’t sell it, now I will explain how to turn it into a simple but effective component tester.

The name “Octopus” maybe doesn’t say anything alone but if you google it along the words “curve tracer” you will obtain thousands of result.In few words an “Octopus” curve tracer is a small circuit that used in conjunction with a scope allows to display  the voltage across a component under test on horizontal (X) axis versus the current through that component on the vertical (Y) axis.A scope set to X-Y mode is required (most of them have this feature).

There are lot of variants of “Octopus” circuit, personally I choose this one:

since it applies small voltage (less than 1VAC) and current (less than 1mA) allowing to test unpowered components also in circuit without risk of damaging them.

As you can from picture above circuit is made of very few common parts : there is a transformer 120VAC to 6.3VAC ( I’m in Europe so I used a 220VAC one), three resistors (the 560 Ohm and 100 Ohm ones forms a voltage divider to obtain 1VAC , then the 1KOhm one limits current to 1mA) and two probes.

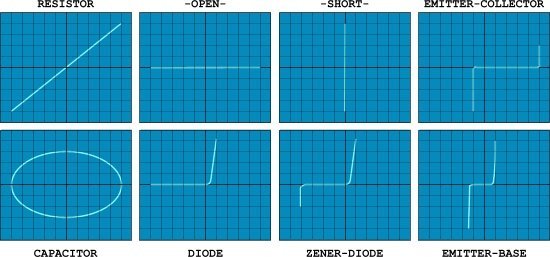
This   circuit will produce a “signature” waveform on the oscilloscope to aid in the testing and analysis of shorts, opens, and leakage in just about any electronic component including resistors, capacitors, inductors, diodes,transistors and digital ICs too.Each component has a characteristic waveform (called “Lissajous” pattern), some examples:

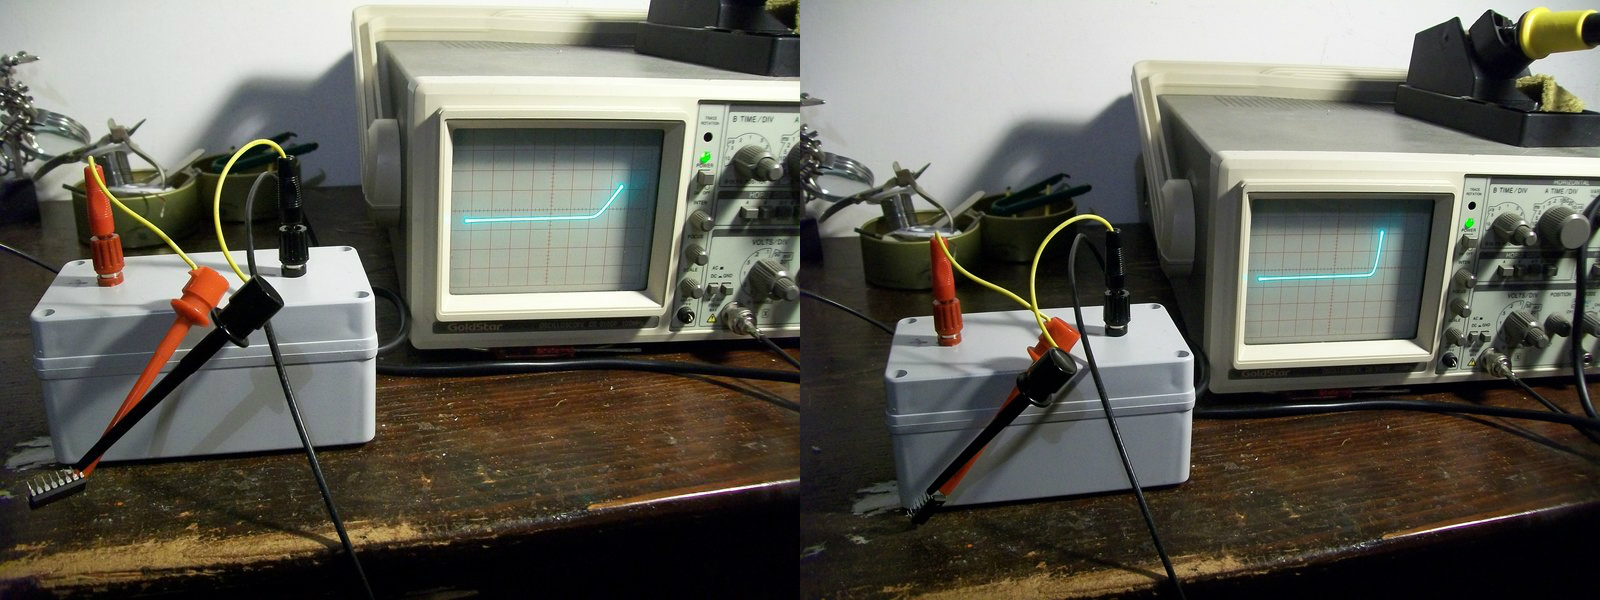
Now, you will wondering what this device has to do with arcade?Well, personally I find it very uself  when I probe ICs out of circuit.For example, in my last repair I was unsure if a 74LS367 was good or not since I got discordant results from my testers.Probing it with the curve tracer and comparing its patterns with the ones of a good known IC removed all doubts:

74LS367_comparing

On the right the pattern generated from a good IC (74LS367), on the left the one from the defective one.Specifically you can see how the junction (internally a TTL contains transistors) of an output (PIN9) is weakened compared to the good one (pattern doesn’t have the healthy ‘L’ shape of a good diode/base to collector junction)

Obviously this curve tracer can be used also to test components in-circuit (thanks to the low voltage/current applied) but in this case experience is needed as components can interact each other producing misleading results.The best option would be having a good board as reference.

If you want to read more about, I recommend you this document:

https://www.qsl.net/kd7rem/pdf/octopus.pdf

So, what are you waiting for?Go and build your “Octopus”! 🙂

 Posted by at 11:36 pm
Apr 252015
 

Ive been looking for a cheap small voltage display for a project I’m working on and I turned to eBay to try a few of the cheap ones out.
I dont need anything spot of accurate but an indication of what I’m supplying.

My search led me to this one

It looks small and it was certainly cheap enough at 99p delivered.
It arrived today and it doesn’t look too bad.

I hooked it up to my power supply to check its accuracy and usefulness.
The description claims this thing can display from 2.5v – 30v so lets test those claims out.
NOTE: I really struggled getting a clear shot of the display with the useless HTC One camera and the fluorescent lights but you can make it out.

With the PSU set at 2.5v we get this:

Not bad at all. What happens when we go lower? Well I got to 2.489v and the display starts flickering like mad.

At the lower voltage of 2.5v the display is a bit dim. Perfectly readable but dim.

Next, 3.3v

And 5v

I did a bit of extra testing around the 5v area mainly as this is the voltage I’m going to be operating it at.
I tested at 5.2v

And to check the accuracy I checked it at 5.125v and 5.126v.

I’m happy with that even if I don’t need the accuracy too much.
Next up I tested 12v

20v

Finally I just tested its claimed maximum of 30v

The display gets a lot brighter at this voltage.
This unit I got didn’t need any adjustment but there is a small pot on the back to adjust it if required.

Its certainly not the best in terms of build quality but for my specific needs I’m quite happy with this really.

 Posted by at 11:52 am

Homebrew Gameking cartridge

 General  Comments Off on Homebrew Gameking cartridge
Apr 222015
 

Today I finally got my homebrew Gameking cartridge working.
Its a bit of a mess as there are several failed original design decisions hacked out.
The idea behind this is to hopefully get the internal ROM dumped so emulation will be possible.

IMAG1267

IMAG1269

 Posted by at 8:51 pm